If you’re having sound issues on your Windows 11 PC after tweaking settings, don’t worry. You can reset all audio preferences by clicking “Reset” in Sound settings. If that doesn’t fix input, output, or volume problems, you can reset your audio driver, restart Windows sound services, and try other quick fixes to restore sound. Here, we’ll explore methods to reset audio settings in Windows 11.
Method 1: Reset all Audio Settings from setting
- Open your Sound settings by clicking “Search” in the taskbar, typing “sound,” and selecting “Sound Settings.”
- Alternatively, access Sound settings from the Windows menu by clicking “Settings” and selecting “Sound” in the right panel.
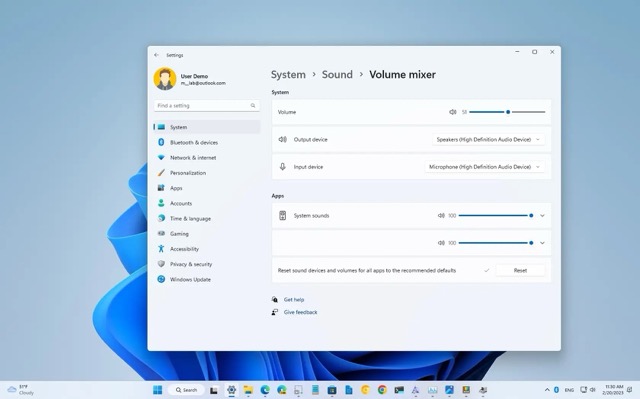
- Click on “Volume mixer,” located in the “Advanced” section at the bottom of the right panel, just below “All sound devices.”
- Look for the “Reset” button at the bottom-right corner of the right panel.
- Click the “Reset” button to restore all original audio settings in Windows 11. This includes resetting volume levels, defaults, and audio enhancements to their factory settings for all installed apps.
This method will help resolve any audio-related issues you may be experiencing by returning settings to their default configurations.
Method 2: Reinstall the Audio Driver
- Open the Device Manager. Right-click the Windows Start menu and select “Device Manager.” Alternatively, click “Search” in the taskbar, type “device,” and then click “Device Manager.”
- In the Device Manager, click the arrow next to “Sound, video, and game controllers” to see the installed audio drivers.
- Double-click the audio driver you want to reset to open its Properties panel.
- Click on the “Driver” tab to view the driver details and options.
- If you encountered issues after a recent update, you can try rolling back the driver by clicking “Roll Back Driver,” choosing a reason, and clicking “Yes” to confirm.
- To uninstall and reinstall the driver for a complete reset, click “Uninstall Device,” check the box next to “Attempt to remove the driver for this device,” and click “Uninstall.”
- Restart your PC. After signing back in, Windows will automatically reinstall the audio driver.
This process aims to address sound problems by reinstalling the audio driver with its default settings.
Also, Read This: How To Create A Group Chat On Discord
Method 3: Restart Audio Services
- Open the Services app: Click on Search in the taskbar, type “services,” and select “Services” from the search results.
- Stop and restart the three audio services: Right-click on each of the following services—Windows Audio, Windows Audio Endpoint Builder, and Remote Procedure Call (RPC). Select “Restart,” and confirm by clicking “Yes.”
By restarting these services, you can refresh the background processes that control audio on your PC, potentially resolving sound issues in Windows 11.
Method 4: Run the Audio Troubleshooter
- Open Sound Settings: Click on Search in the taskbar, type “sound,” and then select “Sound Settings.” Alternatively, you can access Sound settings through the Windows menu by clicking Settings and selecting Sound in the right panel.
- Choose to troubleshoot option: In the “Troubleshoot common sound problems” section (found in the “Advanced” area about halfway down the right panel), select either “Output devices” for speaker-related issues or “Input Devices” for microphone or recording device problems.
- Start the troubleshooter: Click “Yes” to initiate the troubleshooter and follow the prompted steps. The troubleshooter will ask questions about the audio problems and take necessary actions to resolve them.
By running the audio troubleshooter, you can address common sound issues and potentially reset problematic devices causing audio troubles on your Windows 11 PC.
Also, Read This: How To Access Bios On Windows 11
Method 5: Reset Individual Audio Devices
- Open the Control Panel: Click on Search in the taskbar, type “control panel,” and select Control Panel in the search results.
- Access Sound settings: Click on Sound. If you don’t see this option, go to Hardware and Sound first, then click on Sound.
- Choose the device to reset: Click on the device you want to reset (either an output device like speakers or headphones or an input device like a microphone).
- Select Properties: Click on Properties, located at the bottom-right corner of the window.
- Navigate to the Advanced tab: If the device has advanced settings, click on the Advanced tab at the top of the window.
- Restore Defaults: Look for the “Restore Defaults” button, usually near the bottom of the panel, and click it. This action resets the device’s settings back to their defaults.
- Check other tabs (if applicable): If there’s no Advanced tab, explore other tabs like Spatial Sound or Enhancements for a “Restore Defaults” button. If available on multiple tabs, click the button on each tab to ensure all original settings are restored.
By following these steps, you can individually reset the settings for your connected audio devices on your Windows 11 PC.
Method 6: Reset Windows Sounds to Default
- Open the Control Panel: Click on Search in the taskbar, type “control panel,” and select Control Panel in the search results.
- Access Sound settings: Click on Sound. If you don’t see this option, go to Hardware and Sound first, then click on Sound.
- Navigate to the Sounds tab: Click on the Sounds tab, which is the third tab at the top of the window.
- Choose the Windows Default sound scheme: Click the “Sound Scheme” drop-down menu and select Windows Default. This action will undo any changes you made to your sound scheme.
- Save changes: Click OK to save your changes. Now, all of the built-in Windows sounds are restored to their default settings.
By following these steps, you can easily reset the system sounds in Windows 11 back to their original configurations.
Conclusion
We’ve shared various methods for resetting audio drivers in Windows 11. If you encounter any issues or need further assistance, please leave a comment below. We’re here to help and will try to resolve your problem promptly.